Crafting is one of the easiest ways to help your toddler learn a wide assortment of things. However, the creativity of toddlers can get out of hand at times and might even cause a bit of a disaster zone. More often than not, supplies are broken, used up quickly or lost. This can really add up if you’re continuously working to replace the items your toddler loves to use the most. Luckily, there are a few ways to get even more out of your craft supplies, even when you think they might be long gone. These tips will help cut back on how much you spend on arts and crafts while empowering you to handle craft problems without throwing out an abundance of supplies.
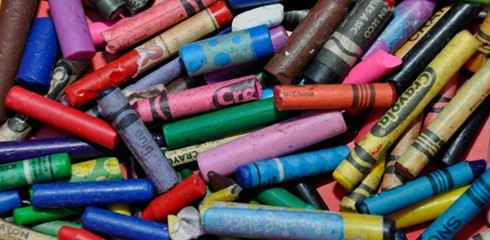
1. Melt Crayons
Crayons are one of the most commonly replaced items in a toddler’s craft set. These items are way too easy to lose, but they’re also fun to snap. On top of that, if they’re stepped on, washed or left outside then chances are they aren’t usable. Often, kids will also collect a big box of crayons that can hardly be gripped because they are so small. This can truly be a pain in the neck, especially when you’re working on motor skills. Instead of tossing out broken crayons, you might consider melting them into one larger piece. You can gather similar colors and then place them in a mold. You bake the crayons or even place them in the microwave. Then, let the mixture sit and dry and your child will have crayons in fun shapes that can’t be beaten. You might also find that mixing crayons in one mixture can also be a lot of fun.
2. Dried Markers
Dried markers are also a common occurrence. Most toddlers don’t think twice about putting the lid on their markers and when they do they might not put it on all of the ways. Instead of just tossing out markers that aren’t doing the trick anymore, you might consider soaking them in water that has a touch of vinegar mixed into it. The same can be done with a little rubbing alcohol. If this doesn’t work then you might inject the marker with water and see if that helps. If nothing works then don’t toss the markers out, instead recycle them with Crayola, even if they aren’t from the same brand.
3. Revive Play Doh
Play-Doh is another pesky culprit when it comes to sucking away money. This craft object always seems to dry out, which means it needs to go right into the trash in most cases. However, this isn’t quite the case as you can actually rehydrate your Play Doh. All you have to do is add some water to the dried-out play-doh and massage the water into the dough. Soon, it will have its original moistness, which will make it easy for kids to play with. Another option is to add dough to a zip lock back with a moist paper towel overnight. In the morning, kids should be able to play with the dough as if it were brand new. Of course, you can use these methods with more than just the brands, as it will help rehydrate homemade dough too.
4. Make Your Own Watercolor
Watercolors tend to dry out very quickly too, especially when a toddler is using them. So, you might consider making your own instead of continuously buying them. Making watercolors isn’t an intimidating task either. All you have to do is find something that will add some color to the water. One of your best options is to use old markers. All you have to do is place them in a jar of water overnight and you should have a wide variety of watercolors to work with the following morning. The more colors you make the longer they will last, which will save you a lot of shopping trips and quite a bit of money. There are many other ways to make watercolors too, so search around and find the method that works for you.
5. Coloring Sheets
A new coloring book can mean the world to a child. However, it isn’t uncommon for the entire book to be colored in within a few minutes of purchase. Instead of spending money on new coloring books constantly, try to preserve your child’s favorite options. You can easily scan the book and store it for later use on your computer or simply copy and print each page that your child wants to do. This will keep the book color free, so children can color their favorite images over and over again. To save money, you can even print on both sides of the paper.
6. Repair Brushes
When kids are just starting to gain motor skills, they might not be gentle with brushes. This can cause a problem if you don’t want to keep purchasing new brushes every few days. So, you might want to invest the time in learning how to repair the brushes. It actually isn’t an intimidating experience. All you have to do is remove all of the paint from the brush which can be accomplished with turpentine or boiling water. Once you’ve removed all of the debris rub the brush in an upward motion with a towel. You will then be able to see the bristles that have been pulled or broken. From there, cut the strays and put the brush back in its original cover to help recreate its shape.
7. Save Paper Scraps
Paper scraps are bound to happen when kids are learning to cut. Kids might even go through a ripping stage, which can leave a lot of scraps lying around the house too. Instead of just tossing these items out, you might want to save them for mosaics or other projects. Kids will love making new images out of paper, which can be a great lesson for them and will help with imagination and motor functions. You can also use them to create paper beads and other fun crafts. Kids can have so much fun with scraps that you’d actually be surprised what they can come up with when using them.
8. Restore Glue
Glue can also be a major problem since kids tend to not want to put lids on items. Even if you find dried up glue, you won’t have to just toss it out. Classic glue in a container can be dropped into hot water. After sitting in the heat for a while, the glue will be restored to its normal sticky state, so kids can go back to helping out with craft time. Glue sticks are another story though. For glue sticks, you’ll need to place the stick without its cap in a ziplock bag with a moist paper towel. After at least eight hours of sitting in the moisture, your glue stick will be ready to go. This can be accomplished as often as necessary too, so you won’t have to stress about missing lids and other common problems.
9. Stick with Stamps
Stickers will make a toddler happy. That is, for about five minutes and then the stickers you just purchased are placed wherever your toddler can reach. As you know, removing some stickers from hard surfaces can be a huge pain and might even end up fruitless. Plus, most toddlers end up getting upset when they find out the stick is gone. So, you might want to swap to stamps instead. You can purchase stamps and ink at a very low price. You can also make your own stamps to suit your child’s needs. Stamps can be used again and again too, so your toddler won’t be upset when their favorite image is gone, as it won’t even be a concern.
10. Use Recyclables
You don’t really have to spend an abundance on crafting supplies when you have a little one at home. Instead, you might consider using recyclables that you have around the home. For instance, toilet paper and paper towel rolls can be used for so many crafts that it’s not even funny. Another great option is to use noodles which can be used for pictures, jewelry, and instruments. Of course, this is only the beginning of the crafts you can make. If you’re low on ideas, then search around for recyclable crafts to see what you can find.
Crafting with children is an important way to help them grow and learn. However, crafting supplies can really cost a bundle during these years. So, it might help to keep this list in mind, so you can keep the items you already have for a lot longer. This will not only save you money but will reduce your carbon footprint and teach kids the joys of recycling.